
Ophir Depot Review
By not exactly popular demand I’ve been asked to do an extensive review of Banta’s F/G scale Ophir Depot. I had not considered doing a review of this kit. I built this kit 3 years ago, I didn't take many construction photos, and I didn't document all the problems that I encountered. That said, the Ophir Depot is a beautiful structure. If you model a “what if” D&RGW RR as I do, it will meet your needs as so many D&RGW and RGS depots have the same look and feel. This kit cannot be built in a few evenings. I don’t know how many hours it took but I do know that I constructed it over a two-month period. Or was it a three month period?
On a 1 to 10 scale on how valuable this review is I give it a C-. Wahaha.
Things to consider when building this structure:
-
It does not belong outdoors, at least not for extended periods. It currently resides on a folding table.
-
It requires a large space on your layout, especially if you want to showcase both sides of the depot.
-
It takes a large workbench to build. I needed both my workbench and a folding table, and I even used a section of my layout to spread out the parts.
-
This is one time you should absolutely pay little attention to Bill’s standard comment about reading the instructions then toss them in the bin and build it your way. DO NOT DO THAT! The instructions are 17 pages and the drawings are 25 pages. Take your time.
-
Bill says that this should not be your first Banta Kit to construct. He means it. Although he says that the kit is relatively easy to build, he also says that it can be a bit complicated at times. I should have focused on the statement,"a bit complicated at times." Yes, once again I should have paid more attention to the instructions. This was probably the fifth or sixth Banta kit I had built so I figured that it would be “easy-peasy” as Bill often says. It was not. Even so, I did it and it's a great depot.
-
I did deviate from the instructions but only on how I finished the roof, extended the platform and added a dock. I also added interior detail to the station portion of the depot. At one point the interior even had lights.
-
Bill says to build it on a 2’ x 4’ x 3/4” MDF baseboard. Did I listen? Not at first. Ultimately, I did mount it to a 19” x 50” x 1/2” particle board. Fortunately, I built it on a very flat/level workbench. Would I have been better off building it on, and mounting it directly, to a base board? Probably. Bill didn't recommend immediately attaching the MDF floor to the MNF baseboard. Actually, he didn't recommend attaching it directly to the to the 2’ x 4’ board at all. That might be a good option as it might have helped to keep the walls true and square to the floor. One advantage of not immediately mounting the MDF floor to baseboard is that you can use tape to hold the wall secure to the floor while the glue sets up. See photos below.
I guess I should explain why I choose to mount it on a 19” x 50” x ½” board. ¾” would have made the deck too tall relative to the code 250 track and I did want the depot permanently mounted to the baseboard as the structure had to be moved outdoors when I had folks over for operations. Also, I wanted the extended deck and dock permanently attached to the depot.
Problems I recall encountering when building the kit:
-
The inner (MDF) roadside baggage wall broke just above the door frame as I removed it from the box. Heavy MDF wall with a structurally weak point. See photo below. Sadly, I didn't do a perfect job gluing the two pieces together. That caused some minor problems when I added the MDF parts for the roadside passenger door. Sanding was required. I also had to do some sanding on the roadside clapboard siding.
-
As I mentioned in a previous Banta kit review, I often make window and door plugs to help align the exterior siding to the MDF substructure. A moment of truth: I only started doing it on this kit after I realized that I was not getting a perfect alignment between the clapboard siding, the base board siding, and the door and window framing, to the MDF. This only happened in a few locations. As usual, sanding was required in several window and door openings. Part of the problem was caused by the spray adhesive that I used, which set up rather rapidly on the larger sections of siding. It had to be laid down on the MDF perfectly, because unlike wood glue I couldn't slide it into perfect position over the MDF.
-
On most of my large F/G scale buildings I tend to add structural supports to the interior corners of the walls. This is probably a throw back to the days in which I had a garden railroad. As you can see from some of the photos, I added interior corner bracing. Also, it seems that the climate where I live plays havoc on glued joints, even those that are inside my train building, mostly because I don't do a good job with temperature control in the train building. Besides, when the walls are fully assembled the corner joints are rather unsubstantial. That is not a problem with smaller buildings. If I had initially mounted the floor to a large board, I probably would not have needed the interior corner bracing. In hindsight I wish that I hadn't added bracing to the station portion of the depot.
-
I spent way too much time distressing the wood roof shingles for the station portion of the depot. I distressed every shingle by hand. See below photo on how I did it. It took forever. As I had bags of individual cedar shake shingles, I should have used them. I would have saved a lot of time, but ultimately I’m very happy with how the distressed shingles look.
Helpful hints:
-
Sequence of assembly is critical. Do not deviate.
-
I used a shaker can to paint all exterior components of the kit except the window sashes. Of course, the sashes could have been painted with a spray can as well. I used an airbrush. Why? Because it was sitting on my workbench. I was not overly concerned with getting a perfect color match with D&RGW or RGS depot yellow.
-
You will need lots of clamps and tape to hold sections of the structure together when you build this kit. Don’t use masking tape. See photos. You should also make sure that your corner connections are perfectly square. If you don't have at least a dozen clamps, go to the hardware store and buy some. I don't have good luck using clothespins. Note in the photos the type of clamps that I use. Bill’s direction shows four photos in which he uses clothespins. Don't assume that they are they only places that clamps and tape will be required.
-
The instructions can be a little confusing at times. Don't proceed until you fully understand each step. I know, instructions are intended for everyone except males between the ages of 60 and 80. Not!
-
In some cases, it's better to use contact cement rather than spray adhesive. Don’t ask where, as I don’t remember. Oh wait. I do remember using contact cement on the roofing, the mostly unnecessary corner braces, and I also used it to glue the coffee stir sticks to the dock platform and deck.
-
Consider extending the station platform and even building an elevated unloading dock.
-
Several D&RGW and RGS depots had elevated loading/unloading docks. The height of the docks varied for some reason. A few examples: Crested Butte, the RGS Macos, RGS Rico, and especially the Chama and Taos depots.
-
This is important: on this kit don't do like I do and model by trial and error.
Below is a list of how I differed from the instructions. Other than the interior, that you can’t really see, and the curtains, the major changes were as follows:
-
I distressed the wood roof shingles and I only used them over the passenger portion of the depot. It became too time-consuming to distress enough shingles to cover the freight roof. I used very fine black sandpaper over part of the passenger portion of the depot and very fine red/brown sandpaper over the freight portion of the depot.
-
I extended the platform deck using coffee stir sticks. I also built an elevated freight platform with ramp and stairs using coffee stir sticks. I even distressed the wood. I used an interior oil based gray wood stain on the deck and dock. If I recall correctly, I used solid pieces of fir to build the elevated deck on.
-
You will notice that I controlled myself when weathering the building. On my "what if" RR the depot was constructed in 1942 and the year being modeled is 1947.
-
I named my depot the Los Alamos Junction Depot.
All In all, this was a great kit to build even though there were moments of great frustration. Don’t let that dissuade you from purchasing the kit. The end results were well worth it. One more thing, you might want to add a depot-mounted train order board. See photo below of a depot-mounted order board that you can get from Ozark Miniatures. On small branch line operations such as I model, not every station/depot had passengers to pick up. In that case the order board would show green unless the were train orders to be picked up by the conductor. Yes, big over simplification.
Off on one of my tangents:
Did you know that coffee stir sticks are made of birch wood? A typical stick is 1/4" wide by either 5.5" or 7.5" long. They are approximately .09 inches thick. In G scale that's about 5.6" wide by 2" thick. They make great decking and siding. They are far cheaper than basswood scale lumber.
Above I said that I included an interior in the "station" portion of the depot. To many of you that might not have made much sense. What’s the difference between a depot and a station you ask? By the strictest US definition: a station is any point named in the Timetable; and a depot is a building. But many railroaders refer to depots as buildings in which commodities are unloaded and loaded. Of course, it could also mean where passengers get on and off trains. So, you ask, why are so many depots called Grand Union Stations? Heck if I know. Anyway, I choose to call the passenger portion of a depot a station.

Notice the extensive use of clamps and Tape.

Mostly unnecessary bracing. Note repair above freight door. Strip wood was used to reinforce break in MDF.

As I said, you will need lots of table space. Yes, my workbench is usually a mess.
Slowly coming together. Photo below shows window glazing being added.


You probably noticed the tube of Goo. Yes, I use a lot of Goo.
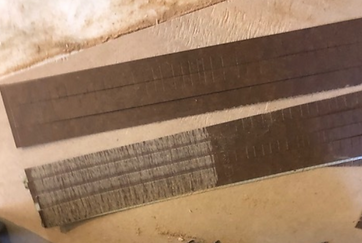
Was the end results worth all the extra effort to distress the wood shingles? I guess I will leave that up to you to decide.
Yes, I'm crazy. I used a blade to distress each roof tile. Don't do it unless you have absolutely nothing better to do with your time. Okay, that's a big lie. I used a brass wire wheel and a drill motor. Even then, it took forever.


Normally I pre-stain the stir sticks. That's more time consuming. If I apply them first then I can use a big brush to stain them. I bet you are wondering how I cut the ends flush with the base board. I hate to say it, but I don't remember.
Stir sticks (coffee stirrers) usually come in boxes of 500 or 1000.

The completed platform deck and loading dock (track side).


Other than the exterior detail such as benches, baggage carts, baggage a scale and people it's done. I did add some exterior detail but I have yet to photo.


Note train order board at Taos Junction Depot. Photo on the right is a G Scale train order board that you can get from Ozark Miniatures.

I did install an Ozark train order board on my Chamita Depot. The depot is on the timetable to always stop but the order board reflects no train orders for the conductor.