
Review of Banta ModelWorks F/G Scale Kits
When it comes to ease of construction, Banta F/G scale kits run the gamut from relatively easy to build, to not so easy. If you take the time to read and reread the instructions, you're less likely to run into problems. To this point I’ve constructed at least ten Banta G and F scale kits. if you go to the "just photos" section of this website you will see at least five of them. As is my nature, I do a quick read of the instructions, start the assembly, glue myself into a corner, refer to the instructions, and undo what I did. In all but a few cases I’ve found the instructions to be clear and concise. Read the instructions a couple of times before you start and then follow them as you proceed with the assembly. Don't glue yourself into a corner like I occasionally do. You would think that after forty years of building fine scale kits I would know enough to read instructions. Not! Though I could blame it on Bill Banta as his instructions often say to read the instructions, toss them aside, and build the kit the way you want to. So, I do. I should also point out that I model by trial and error.
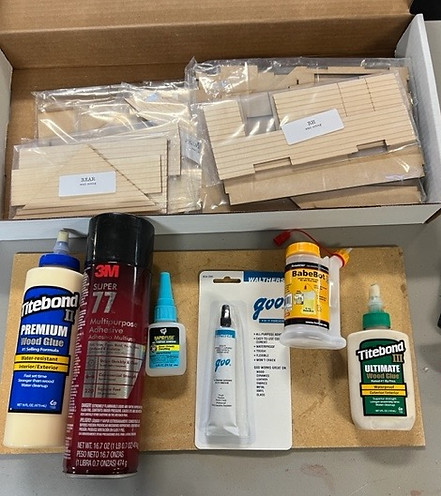
No matter which Banta kit you build you need to decide when to paint/stain the exterior walls. I tend to paint after the outer walls are glued to the frame walls (MDF substructure). I pre-paint and then do the final weathering after final assembly is complete. That is not always an option with some kits.
Bill recommends that you do not use water-based paints to paint the exterior siding. I like working with water-based acrylic paints. Water based paints for smaller scales might be problematic. Some of Bill’s F Scale kits are so large that the best option is spray the exterior walls with a shaker can. Because I tend to paint the exterior walls after they are attached to the frame walls, using water-based stains and paint are less of an issue.
Bill’s kits are not designed for extended stays outdoors especially where I live in New Mexico. If you plan to leave them outdoors for more than a few days at a time, I suggest that you spray the whole building, prior to adding the window glazing, with a coat of clear matte UV spray. I prefer Krylon UV-resistant clear matte acrylic spray. Don’t overdo it. If you weather your structures with pan pastels or powdered pigments, the clear matte spray will make the weathering nearly disappear.
Many of Banta’s kits are significantly enhanced when you add interior detail. The “Bakery” absolutely requires interior detail. Because of the large windows, Duncan Boots also requires interior detail. If you’re going to add interior detail, you need to consider adding interior walls and lighting. If you add lights you need to make the roof, or at least sections of the roof removable. You will notice that Bill Banta uses lots of signs and posters on his windows to hide the interior. Fortunately, Bill now has available lots of interior furnishings. Stocking the shelves, display cases, and work benches is another problem. Check out the “Interior Detail” section of this website for ideas on how to detail building interiors.
Some of Banta’s kits are rather large and require a large footprint. That said, for practical reasons they are often downsized while remaining true to scale. That can be slightly problematic when adding interior detail. That is clearly not a problem with his Ophir Depot and his new Sargent Roundhouse. If I hadn’t already scratch built a three-stall engine house, I would seriously consider building the Sargent.
More often than not, the joining pieces of the kit fit together perfectly, but do not assume that that is always going to be the case. As Bill suggests, test fit before attempting to glue. Also, on many of the Banta kits the exterior laser cut basswood siding is glued directly over a sturdy substructure of laser cut MDF. Once again, test fit before gluing. Do yourself a favor when test fitting the exterior wall siding to the support structure also test fit the windows and doors. The windows are a bit fragile. If you use plugs, they can be left in place as the glue dries. See helpful hints below regarding plugs. By the way, Bill manufactures his kits in Vermont. I live in New Mexico. Unlike Vermont our humidity is almost always very low. Humidity in large scale kits will have a minor impact on fit. In conditions where wood shrinkage, such as the wood siding, is .05 percent, the MDF shrinkage will be .25 percent. Is it an issue? No, but minor sanding may be required.
Speaking of windows, when scratch building, I often use Banta windows. Doors are easy to scratch build. Windows, not so much. Bill has a great assortment of doors and windows. For example, on my Chamita Depot I used Banta windows.
Let’s discuss doors. A “typical” exterior door is 6’ 8” tall by 3’ wide. Banta doors in F (20.3) scale are 6’ tall. In G (22.5) scale they are very close to 6’ 8”. Does it matter all that much? Only if you have a tall F scale figure directly in front of the door. In actual inches the difference between a 6’ door and a 6’ 8” door is about .4 inches. Other than the Sargent roundhouse, I would say that the Banta F/G kits are very close to 1:22.5 rather than 1:20.3.
Let me go off on a tangent and talk about the scale Bill manufactures his F/G scale structures to. I believe that Bill wanted to build structure kits that would be suitable to 1:24. 1:22.5, and 1:20.3 scales. I believe that his kits are very close to 1:22.5. Very loosely, 1:24 is 10% smaller than 1:22.5 and 1:20.3 is ~10% larger than 1:22.5. Most folks cannot tell that the structures on a layout are off in scale by 10%. I can’t. I can’t even tell the difference between a 1:18 scale vehicle and a 1:22.5 scale building. I'm going to start with the CONOCO Gas Station. Other reviews are on sub pages to this page.
Reviewing the CONOCO Gas Station
The gas station has considerable visual appeal and would look appropriate in just about any railroad town. Bill Banta refers to the kit as a typical 1930s and 1940s gas station. It would also be appropriate to the 1920s and even the early 1950s. The visible style gas pump that you can purchase with the kit was very common in the 1920s. More on that later. Photos and Links at bottom of page.
If you are new to Banta kits this is a great one to start with. Except for three minor issues it is a problem free kit.
-
For most part the directions are clear and concise. If you’ve built Banta kits before this, you may not even notice the minor oversights. Such as the roof trim. Check out the helpful hint section below.
-
Banta large scale kits typically come with doorknobs with plates. This kit did not.
-
A building of this vintage and type would most often have some type of smokestack. I’m a little surprised that this one did not. More on this later.
Structure Assembly and Finishes:
As stated above, for this kit, like most of the F/G scale Banta kits that I’ve assembled, the exterior laser cut basswood siding is glued directly over a sturdy substructure of laser cut MDF. Always test fit the siding before gluing to the MDF. Because the gas station structure is relatively small, there should be no problem with getting a perfect fit between the structural components. Nonetheless, do yourself a favor when test fitting the exterior wall siding to the support MDF support structure, and also test fit the windows and doors.
When assembling a Banta kit, before I start construction I decide what the color of the building will be, including the doors and windows and the extent to which I would weather the building. In this case I decided to go with a finish that reflected years of neglect in the harsh northern New Mexico climate. I also wanted it to represent a gas station constructed in the 1920s. Part of the justification for the 1920s is that I wanted to use the Banta visible style gas pump.
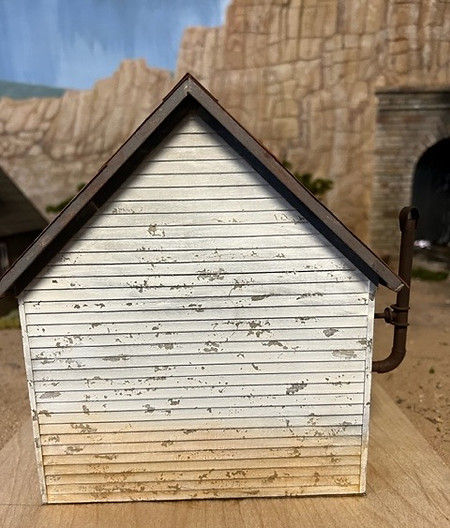
Once the siding was glued to the MDF frame I haphazardly stained the walls with a brownish and gray acrylic wash. Once that was dry, using a paint brush, I randomly applied splotches of rubber cement on all exterior walls. I then sprayed the exterior walls with Krylon chalky white paint. After the paint dried, I rubbed the siding with my finger and a bristle brush which removed the paint where the rubber cement was resulting in a peeling paint effect. Not being fully satisfied I used a brass burnishing brush to further dilapidate the siding. Once that was done, I dry-brushed white acrylic paint over the surface of the siding to give the appearance that the building had been painted more than once. For the doors, window and door frames, and the roof trim I used Krylon chalky gray. Why gray? Because I had a can of it on hand. To weather the frames and trim, I pressed 3M tape onto the painted surfaces, which randomly removed paint. It is best to do that within 60 minutes of painting. Powdered pigments were used to ad dirt stains at the base of the building. By the way, CONOCO gas stations historically had green trim.
Rather than use the roofing material provided in the kit I decided to go with a corrugated tin roof. As I said above, I tend to model by trial and error. I tried a tar paper roof first and decided that it just wasn’t right. During the 1920’s in New Mexico, roofs on structures of this type were often pitched (gable) and were frequently covered with corrugated tin. Given that the gas station was built in 1920 and my railroad represents 1947, the corrugated tin roof had just 27 years to rust/oxidize. How much weathering would a tin roof undergo in just 27 years? Tin roofs from the 1900s lasted between 30 and 40 years with some lasting as many as 50. Obviously, climate was a big factor. I wanted my roof to be heavily weathered. Frankly, I probably over weathered it.
As mentioned above, Banta kits typically include doorknobs. This kit did not. I usually have a supply of doorknobs. Unfortunately, I could not find them. If you don’t have any, just use a pin with a plastic ball top head.
At this point I had to decide whether I was going to add interior furnishings, commodities, and lights. For now, I decided to paint the interior walls a dark brown and not add wall paneling or any interior detail except for window shades on the side windows and a photo on a panel of a shop interior. If you check out the section on the CONOCO station that I scratch-built you will notice that it has considerable detail within the building and around the building. It took forever to do the detail. I believe that adding interior and exterior detail to Banta’s CONOCO station would enhance it greatly. You can look at the type of detail that can be added to a gas station by checking out my CONOCO scratch-built station. Link provided below.
I decided to add a smokestack for a potbellied stove as they were the norm in New Mexico from the early 1800s through the 1950s for most small stores in rural areas. I used styrene tube, a styrene elbow, and ABS pipe support.
Signage:
The kit gives you two pole sign options. The triangular CONOCO sign provided was used between 1930 and 1970. In the 30s and early 40’s the standard red and white triangle CONOCO sign was 42”x42”x2”. It was hung from a scroll arm attached to a metal pole. The size of the one in the kit is 7’ x 7’. I believe that the pole mounted (non-hanging) triangular sign was approximately 6’x6’. I could find no examples of any being 7’x7’. That doesn’t mean that they did not exist in the 40s and later. The tapered four-sided pole provided in the kit was very prototypical of the type used by CONOCO starting in the 40s. Its sign was likely bigger than the type hung from a pole scroll arm. I don’t believe CONOCO ever used a large round pole sign as provided in the kit. At least I was unable to find any photos of one and it’s not in any of the historic CONOCO documents that I could find. I believe the image is from a 25” 1930s – 1940s porcelain sign. Does it matter? I doubt it. How many model railroaders do you know that are knowledgeable on the history of CONOCO signs or their size?
I chose not to use the roof CONOCO sign or the large GAS sign that came with the kit. Instead, I used an image of an actual CONOCO sign that was typically mounted on the front of the station. I printed the sign on a LaserJet printer. I distressed/weathered the sign using 3M tape and powdered pigments.
A few interesting factoids: In 1945, or thereabouts, CONOCO started making porcelain signs and outdoor posters with the image of DC Comics’ Superman to advertise their N-Tane gasoline. There were several different versions. Small porcelain signs for the gas pumps, larger porcelain signs which were hung on the exterior of their gas stations and posters that were hung strategically about town. In addition to the signs, it was common to see CONOCO newspaper ads that featured Superman, and other superheroes, used in their advertising campaigns. You will note that I used a couple Superman/CONOCO signs on my Banta CONOCO gas station.
Gas Pumps:
Not all States had CONOCO gas stations between the 30s and 50s. Also, if your railroad is post 1945 you might want to consider using a different gas pump than the visible-style that you can get from Banta. In 1/18 scale you can find a large selection of gas pumps of different vintages and gas companies. They are very inexpensive. See below for information on available types of die-cast 1/18 scale gas pumps. If you are going to use a visible-style gas pump, I recommend the one that Banta sells. It costs considerably more than the die-cast ones that are available, but I feel that it’s worth it.
Is the visible-style pump right for the era you model? A visible style gas pump was very common from the 1920s through the 1930s. By the 1940s they were far less prevalent. The visible-style gasoline dispenser used a hand operated pump to transfer gasoline from the storage tank into the visible cylinder at the top of the pump. Once the cylinder was full the filling station attendant would then place the gas nozzle into the tank of the automobile. A valve on the nozzle would then be opened to allow gravity to flow gasoline into the vehicle. The amount of gasoline dispensed into the tank would be measured by the amount drained from the cylinder based on a gallon scale on the outside of the cylinder or within the cylinder. In the mid 1920s, the electric clock-style meter pump began to replace the visible cylinder. By 1932, the motorized clock meter pumps were the most common pump being manufactured. Motorized pumps replaced hand crank pumps in all areas of the country with electricity. Many remote rural areas were still without electricity through the 30s and into the early 40s. All that said, selecting the right type of pump for the era you’re modeling is probably not that important. I model 1947 and I already had 3 visible-style gas pumps on my layout. I have seen vintage photos of visible pumps still in use in the 1940s. Check out the vintage photo of the Penasco New Mexico CONOCO station elsewhere on this site. Link below.
The Roof:
If you want to know how I made and weathered the corrugated roof, read on. I cut card stock into scale 2’2” x 6’ lengths. I used a Fiskars paper crimper tool to corrugate the card stock. I then spray painted the card stock with Rust-Oleum Satin Metallic spray paint and primer. I weather each panel separately with several different “rust”colors of powder pigments. I then applied each panel to the roof. The photos tell the rest of the story. Photo below shows the two different tools I use for crimping.
Helpful Hints:
-
The roof trim is not covered in the written directions. They are shown in the parts list. If you’ve built Banta kits in the past, you will have no problem figuring out where they should go. I on occasion use more trim pieces than what comes with the kit. Why? They cover up the gaps when I don't get a perfect fit between all the components. On this kit I also used trim on the front and rear walls just below the roof.
-
As I wanted to be able to remove the roof and I wanted the porch ceiling over the front overhang (covered drive) to be securely fastened to the roof I added some interior ceiling supports to the rear and front roof support of the porch. Make sure that you glue the roof bracing to the side of the roof panels that have the laser cut burn marks. If you don’t do that the exterior siding will end up facing inward rather than outward. Yes, if you test fit the two inner wall supports as well as the exterior wall siding at the same time you won’t have a problem. Don’t ask.
-
If you plan on using spray adhesive for the pole signs, do it before you add the pole support sidings.
-
Rather than using the actual windows for test fitting I made 1/8” thick MDF “plug” scaled to the size of the MDF window openings in the support structure. For this kit I made and used just one 1/8” thick MDF “plug” for the two side windows. The plug was left in place as the glue dried between the siding and the MDF frame. Notice that there are two parts to the window plug, the MDF part that fits in the in the MDF frame and the basswood part that is sized to fit in the window opening in the siding. On kits such as the Ophir depot several window and door plugs were used. Even after doing that a little sanding of the MDF or basswood openings was required to get the windows to line up properly with the window openings in the siding.
All in all, this was a rather simple kit to build. I’m not all that fast when it comes to building models. Over a one-month period I would guess that it took me around 12 hours to build. If I had strictly followed the directions, it probably would have taken me less than 8 hours.
Minor note: Using contact cement, I glued the building to a 1/8” x 2’ x 1’ piece of birch plywood. I currently have no place on my layout for the gas station. All in all, it was fun kit to build even though I’m not sure what I'll do with it.


Stained back wall with dabs of rubber cement.


Rubber cement above, window plug above center, on right window plug in place.
Back wall painted white, rubber cement rubbed off, dirt weathering added to base.
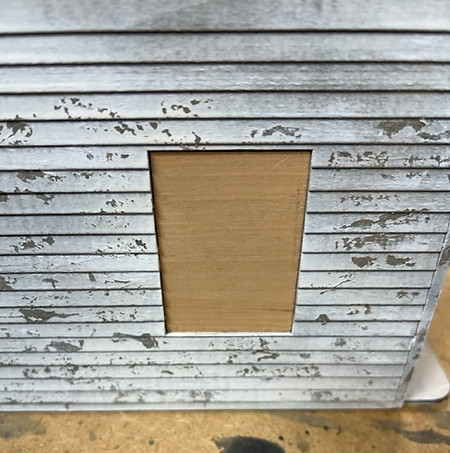

Photo on left shows extra bracing as discussed above. Photos below show extremely rusted corrugated tin roof.

Left side of station with smoke stack and Superman CONOCO sign. Note window shade.


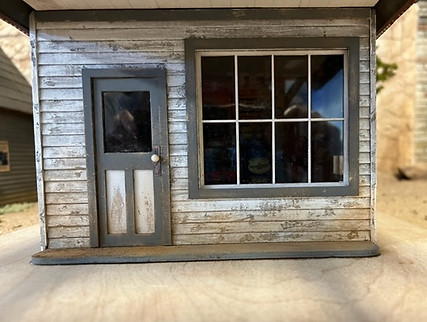
Photo upper left shows right side of station. Note pin with ball top for doorknob. Photo upper right shows entrance to station. Also note doorknob.
Photo on right shows 3 pump CONOCO gas station. The center pump is a circa 1920s visible style pump. The two outer pumps are circa mid 1940s Wayne style digital gas pumps. Note the CONOCO sign on the roof. Photo mid 1940s.
Finished CONOCO gas station, with pump and sign in final location.


Just in case you you want to know what gas pumps looked like between 1885 and 1950.

As far as I could find, there are three styles of 1/18 scale die-cast gas pumps available from several different die-cast manufacturers. Fortunately, there are pumps available that depict numerous different gasoline companies. Unfortunately, I could not find CONOCO ones for my scratch built station so I made my own "decals".